Irrigation System
It’s hard to keep a big community/school garden watered on a budget. Here’s how we’ve set up our watering system this summer, based on a few big purchases (soaker hoses), repairing donated garden hoses, and what tool is the single most important to get the right amount of water into our vegetables.
Moisture Meter

The most important piece of equipment for good watering is an inexpensive moisture meter. This one was donated to us last summer, and we use it every time we are in the garden. It not only helps you know if part of the garden needs to be watered, it helps you figure out patterns long term. What happens if you run the soaker hoses for two hours every other day vs one hour every day? Are all sections of the soaker hose garden getting enough water, or is part too wet and part too dry? How’s the raised bed doing?
If you don’t have a moisture meter, definitely get one.
Automatic Timer
When we’re running a soaker hose, it needs to run a good long time, often after we’ve left the garden. If you see even the tiniest amount of water leaking when you set up the system, check the hose connections to be sure they’re tightened, then check the gaskets, then check the hose end repairs. Seriously: If you’re going to leave the water running 24/7 behind the timer, you can’t have any leaks.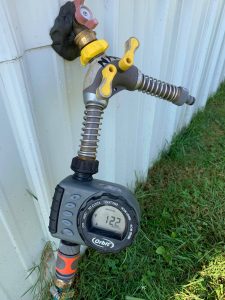 We used to have a lot of leaks at this connection before setting up the soaker hoses, and we were able to completely eliminate them as of today. CHECK EVERY TIME YOU ARE THERE AND THE WATER IS RUNNING. Especially the quick connects, which can eventually unscrew. It takes ten seconds to fix them. You can see some water drops on the trailer wall– this is because the first two tries of tightening the splitter didn’t quite work exactly right. I unhooked it, replaced the gasket, and screwed it firmly back on, and no more leaks. (I’ll still check every time I’m in the garden.)
Equally important, even though not as flashy, to make this work we used:
- A good quality splitter so that people can use the water without the timer. (We’re on the fence about this one– we don’t want people to turn off the spigot and leave the timer turning on and off an empty hose. We’ll have to see how it works.)
- Quick connect fittings so that the hose can be easily moved from the side with the timer to the side without the timer, or so that the hose can be disconnected when the grass is mowed. (Again, this is a little risky– we don’t want people to disconnect the hose and then at 5AM we’re watering the trailer foundation for 2 hours. We’ll play it by ear– this time of year not many other people use this spigot.)
- Really, REALLY good gaskets. These are the ones we bought
this year, and they are MILES better than the new ones that came with various fittings we purchased. Without good gaskets, you simply can’t run a soaker hose system– escaping water reduces pressure too much and you get mud puddles instead of watered plants. - Hose repair kits. You can see at the bottom left of this picture where there is a metal band and a screw at the top of the hose. That’s where a leaky hose has been cut off and repaired. If you’re still seeing a leak after replacing your gasket, you may need to either remove and reattach this metal band, or you may need to cut your hose end off and replace the end with this repair kit (if it hasn’t been done already).
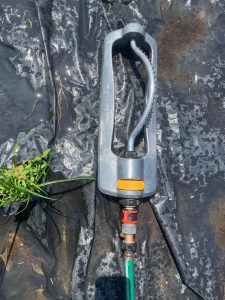
Quick Connect Fittings
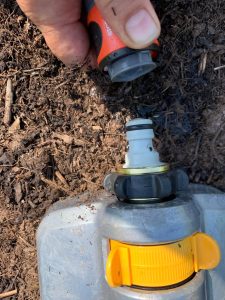 This is what a quick connect looks like. Instead of taking a minute or two to wrestle a hose unscrewed, you simply squeeze the end and pop the two ends apart. Reconnecting is just as easy. Since we are frequently changing the connections from the soaker hose to the wand to the sprinkler, the quick connect fittings were well worth the money.Pro tip: always check to be sure the fittings are screwed in at both ends after you unconnect/reconnect them. They can get the tiniest bit loose as they move around, which causes leaks. It’s trivially easy to tighten them.
You can see in this photo that we’ve got an adaptor hooked up just before the quick connect that lets us turn off the water before unhooking/rehooking it. This is necessary, because quick connects don’t connect while under pressure, and if you have to go back to the spigot to turn off the water, it’s not actually quick at all.
Four high pressure soaker hoses, four donated garden hoses to get them to the right spot, and a four way splitter.
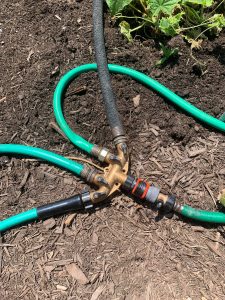 Also quick connects, good gaskets, and the hose with the extra “off” switch at the end.Two years ago, we spent most of our entire year’s garden budget on four high quality high pressure soaker hoses (see the black hose running vertically). They are heavy and clunky and hard to drag around the garden, and we have to pull them up and store them every winter, but they are worth it all!
High pressure soaker hoses are better because they are less likely to spring a leak, and because they do a better job of spreading out the water pressure through the whole length of hose, instead of leaving the plants at the far end to dry out.
When you put even high pressure soaker hoses together, you want to run them in parallel (four short hoses like an octopus) instead of in series (one really really really long hose). Each of these soaker hoses is exactly the right length for three rows, so our four soaker hoses are connect with pieces of regular garden hose to this quad connector (with a quick connect at the feeding hose end), and these soaker hoses cover all twelve horizontal trellised rows in the garden, watering our tomatoes, beans, cucurbits, and peppers.
Every time I’m in the garden I check all of the connections to be sure it’s not leaking, and I think today we finally got the last bad gasket and ran the system with zero leaks! When we’re leaving the automatic timer on, it’s probably going to be running these soaker hoses. We know it’s getting the right amount of water to the plants, because we test with our water meters. The soaker hoses only put out water about 4″ on either side of the hose, so you have to place it very carefully close to the roots of the plants. We use garden staples to hold the hose in the right place.
You have to be really careful with expensive hoses like this– we didn’t get the last two hoses out until this week, because we wanted to be sure all of the mulching was completed. We don’t want volunteers accidentally poking holes in the hoses with spades as they weed or mulch.
- We buy LOTS of these staples, because we also use them to anchor landscaping plastic, and because they do rust after a while.
- These are the quick connects we use.
- We bought 4 of these high pressure soaker hoses.
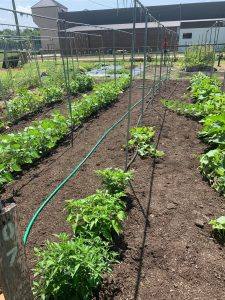 Here you can see the soaker hose running the length of a row. One hose goes up, down, and back up our rows. We never hook soaker hoses together end to end. This section (two rows of beans to the far left and hot peppers and a melon down the middle) was just laid down a couple of days ago, and it’s likely we’ll see a lot more growth down these rows now that we’ve got the watering worked out.
Sprinkler for the rest of the garden
 But soaker hoses are expensive, and THIS year’s garden budget went mostly towards our new raised beds. So for the rest of our garden, we often use a borrowed sprinkler. Sprinklers aren’t ideal– it’s better to get the water at the roots than on the leaves, but it’s certainly better than nothing! This morning, we watered our watermelon, pumpkin, winter squash, and potatoes with the sprinkler, as well as part of our raised beds.
Maybe next year we’ll finance a few more soaker hoses, but you can only run so many soaker hoses in parallel and keep the pressure high enough. How many? We aren’t sure yet.
What we do know is that we never, ever run the soaker hoses in parallel with anything else. So if we want to run the sprinkler, we disconnect the soaker hoses and walk the hose over to the sprinkler and run it on its own. We tested the timer this morning by manually setting the system to run the sprinkler for two hours, and then coming back and checking on it. Then we programmed the soaker hoses for two hours and left for the day.
Rain barrel with splitter and extra hose.
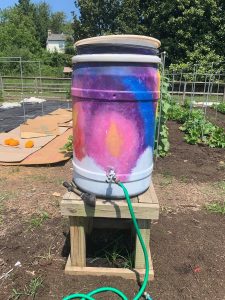 Since we can’t run anything else when we’re using the soaker hoses or sprinkler, we’ve got a rain barrel in the middle of the garden to water the raised beds and the pumpkins/potatoes/melons and flowers.
It takes about 20 minutes to fill the rain barrel from just above the spigot to overflowing when the hose is running on high. It’s been a while since I measured, but I think one full barrel was enough to water both raised beds and the potatoes and pumpkins (and maybe two rows of tomatoes and peppers that weren’t on the soaker hoses until this week). You go through water faster than you think in a garden this big!
You’ll notice the very sturdy wooden platform. You can also use cinder blocks, but since this is a school garden we really, really wanted to be sure that the raised rain barrel would be sturdy and not tip over on a roughhousing student. We’ve got three more rain barrels we are planning to deploy in various parts of the garden as soon as we build platforms for them. Spigots inside the vegetable and pollinator gardens are on our wish list, but until then, we love our rain barrels.
This rain barrel was painted as an 8th Grade IB Service Project, one other one was painted by fasting students (and friends) during Ramadan, and one was painted at the end of year garden party. (One still needs to be scraped and repainted next year.) We love how the rain barrels bring some color into the garden as well as water!
You’ll note that we’ve got another splitter here, so that a student can be watering with the hose while another student fills a watering can. We also have a borrowed wand, which we can attach to the hose when watering.